Network Neighborhood Guide
NOTE: This information is provided only as a reference to
configuring file sharing in Windows95/98. File and printer sharing is
NOT supported by either the HelpDesk or Network Services. No
assistance other than this guide can be offered.
** In order for Microsoft File and Printer setting to work, you must
log into Microsoft Networking when your computer first boots. If you
cancel past this, then you will not be able to see anything in your
network neighborhood **
To be able to use file and printer sharing in Windows, you must first have
the proper components installed. The required components for file and
printer sharing are Client for Microsoft Networks
and File and Printer Sharing.
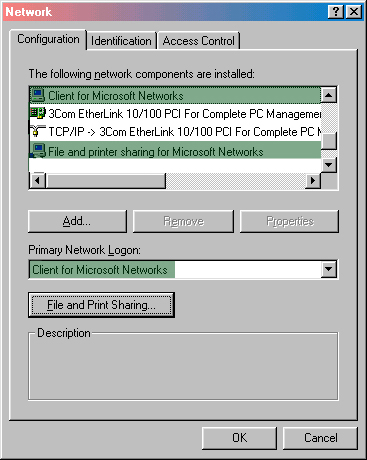
If you have these components properly installed, then your Network
Properties windows should resemble the following:
If you don't have these components installed follow the instructions below
to install them.
Installing Client for Microsoft Networking
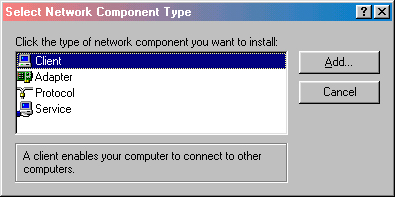
- From the Network Properties window, click ADD.
- Select Client from the component type window and click ADD.
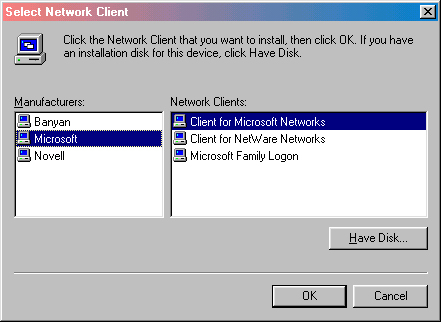
- Select Microsoft from the list of manufacturers in the Select
Client Type window, and then select Client for Microsoft
Networks and click OK.
- Now the Client for Microsoft Networking is installed. In the
network properties window, the Primary Network Logon should say
Client for Microsoft Networks. If it doesn't then you need
to set it. Just select it from the drop-down menu list. You will need
to set your computer name and workgroup information. See "Setting
Computer Identification Information" below.
Installing File and Printer Sharing
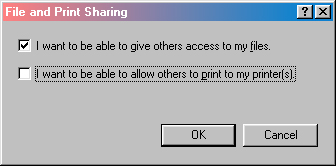
- Click File and Printer Sharing from the network properties
window.
- The File and Printer Sharing window will appear. Select what
resources you want to be able to share, and then click OK.
- Now File and Printer Sharing is installed.
Setting Computer Identification Information
- Click the Identification tab from the network properties window.
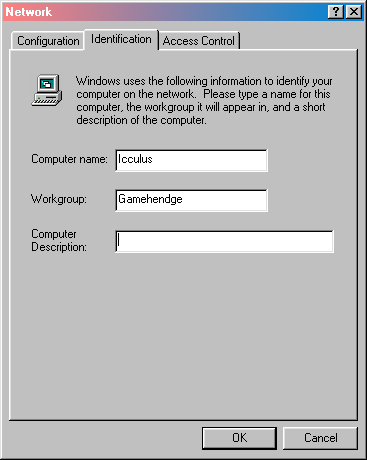
- Fill in the Computer Name and Workgroup information.
The Computer Name should be something that uniquely identifies your
computer. The workgroup can be a workgroup that you create, or it
can be one that already exists like "JMU". (most popular)
If your friend has a workgroup that you want to be a part of then
enter that workgroup name in the workgroup field.
- Click OK to finalize your new network configuration. You may need
to insert your Windows CD to copy files to your hard drive. Then
you will need to restart your computer.
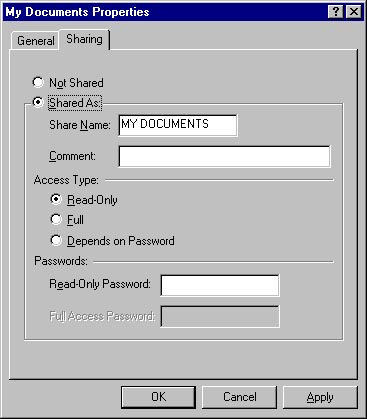
Sharing Files
- Right click on a folder and select "Sharing..."
- From the Sharing Options window, select the name and access rights
for the share, and then click OK.
Using SMB with other Operating
Systems
SMB is the protocol most widely used to share files across a network. The
File and Printer Sharing in Windows is Microsoft's implementation of SMB.
If you are running another OS, such as Linux of UNIX, you can still use
your machine as both a SMB client and server. To do this you will need to
install the SAMBA package, which is avaliable from
www.samba.org.