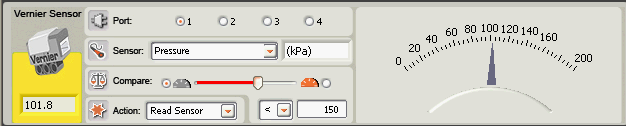
If an NXT is connected to your computer, the feedback box in the Configuration Panel at the lower left of the computer screen shows the live sensor reading. The analog meter next to it in the configuration panel will also respond to match the sensor reading. (To receive feedback, make sure that the Vernier adapter and sensor are connected to the chosen port and that communication has been established with the NXT by either USB or Bluetooth.) The limits of the meter show the range of the sensor.
Using data wires, this block can send out the sensor value in either text (string) or numeric form from the data hub. For displaying readings on the NXT screen, it is easiest to use the Sensor Reading (Text) output and wire that to a Display block set for Text. This will display the sensor reading and the proper units.
When “Raw Count” is selected as the Sensor, the value displayed in the box at the bottom left of the configuration area will be the raw count from the NXT. This number will range from 0 to 1023.
The Vernier Sensor block can also send out a logic signal (true/false) based on whether the current sensor reading falls above or below a trigger point.
A trigger point is the specific value in a range of the sensor where a change in condition occurs. For example, you might program your robot to move forward only when the temperature rises above 28 degrees C. The trigger point would be 28.
Specify the trigger point by using the slider or by typing a number into the input box. To specify the range (above or below the trigger point) that will generate the “true” signal, use the radio buttons or the pull-down menu. The “true” portion of the range will be in color; the “false” portion will be gray.
To switch the “true” portions of the range (setting values below threshold as “true”), you would select the left radio button.
![]() Tip:
Tip:
![]() Tip:
Tip:
The Stainless Steel Temperature Probe (TMP-BTA) and the Surface Temperature Probe (STS-BTA) both are calibrated the same. Choosing Temperature TMP/STS will set up the calibration for either one. Note that there are two listings for these temperaure probes. One will set up the sensor to read temperature in degrees Celcius and one sets up things to read temperature in degrees Fahrenheit.
If the Vernier sensor you are trying to use does not show up in the list on the Sensors pull-down list, that means you need to make a minor change to the Vernier Sensor Calibrations.txt file. This text file contains all the calibration information for each Vernier sensor. It has a row for each sensor. The last number in the row is either 1 or 0. If the last number is 1, the sensor shows up on the pull-down list. If the last number is 0, the sensor will not appear on the sensors list.
Display Settings
-
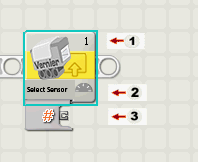
The number shows which of your NXT’s ports are connected to the Vernier sensor. You can change this number in the configuration panel if you need to.
-
This icon indicates at what level the trigger point is set. The more of the semicircle filled in, the higher the trigger point. When the Vernier Sensor block is used to zero or calibrate a sensor, the
 icon will
appear here. When the Vernier Sensor block is used to reset the
calibraton of a sensor, the Reset icon,
icon will
appear here. When the Vernier Sensor block is used to reset the
calibraton of a sensor, the Reset icon,  , will appear here.
 -
The block’s data hub will open automatically when the block is placed in the work area. Click on the data hub and pull down to show the other connectors. (See the Data Hub section below for more information.)
Configuring the Vernier Sensor Block

-
Choose the port where your Vernier adapter and sensor are plugged in. By default, the block will be set to port 1 for a Vernier sensor. You can change this selection if you need to.
-
Choose the Vernier sensor you are using from the pull-down list.
-
Use the slider to set the trigger value or type a value directly into the input box. Select the radio button to the right of the slider if you want the block to be triggered by sensor levels higher than the trigger value; select the left radio button to trigger the block with sensor levels lower than the trigger value. You can also use the pull-down menu to set the “true” portion of the slider.
-
The meter displays the current sensor reading. The range matches the range of the sensor.
-
The feedback box displays the current sensor reading.
-
The Action is normally set for Read Sensor, but it can be set for Zero/Calibrate Sensor, or Reset. See the Zero/Reset section of this help below for more information.
Configuring the Vernier Sensor Block’s Data Hub
You can control the Vernier Sensor block dynamically by connecting data wires (to or from other blocks’ data hubs) to the Vernier Sensor block’s data hub.
Open a block’s data hub by clicking the tab at the lower left edge of the block after it has been placed on the work area.

Data wires carrying input information to a block are connected to the plugs on the left side of its data hub. Data wires carrying output information are connected to the plugs on the right side.

[A] Input plug
[B] Output plug
[C] Number data wire (yellow)
[D] Logic data wire (green)
[E] Text data wire (orange)
[F] Broken data wire (gray)
Passing data from the input plug to the output plug
If an input plug has a corresponding output plug (see A above), the input data will pass through from the input plug to the output plug without being changed. In this case, you can only use the output plug if the input plug is connected to an input data wire; connecting an output data wire to such an output plug without a connected input data wire will cause the output data wire to be “broken” (and colored gray).
Data wires carry specific types of data
Each data wire carries a specific type of data between blocks. For example, if a data wire is dragged from a logic plug on a block’s data hub, it can only be connected to a logic plug on another block’s data hub. The chart below shows what kind of data each plug can accept or send out.
Data wire colors
Data wires are identified with specific colors: wires carrying number data are colored yellow, wires carrying logic data are colored green, and wires carrying text data are colored orange.
“Broken” data wires
If you try to connect a data wire to a plug of the wrong data type, the data wire will be broken (and colored gray). You will not be able to download your program if a data wire is broken.
If you click a broken wire you can read why it is broken in the small help window in the lower right corner of the work area.
Data must be within the possible range of the plug
If an input data wire transmits a value outside the possible range of the plug it is connected to, the block will either ignore the value or change it to a value within its range. For plugs that allow just a few input values (example: just 0, 1, or 2), the plug will ignore the input if a value arrives outside its range.
For plugs that accept larger input ranges (example: 0 – 100), the plug will force any input outside its range to fit.
This chart shows the different characteristics of the plugs on the Vernier Sensor block’s data hub:
| Plug | Data Type | Possible Range | What the Values Mean | |
 |
Port | Number | 1 - 4 | 1 = Port 1, 2 = Port 2, 3 = Port 3, 4 = Port 4 |
 |
Action |
3
options
|
Read Sensor, Zero/Calibrate, or Reset | |
 |
Trigger Point | Number |
Sensor
Min - Max |
Value to compare against |
 |
Greater / Less | Logic | True/False | Logic used in comparison
to the Trigger Point. True = Greater, False = Less |
 |
Yes / No | Logic | True/False | Result of comparison |
 |
Raw Value | Number | 0 to 1023 | The count from the A-to-D converter in the NXT |
|
Sensor Reading | Number | Sensor Min - Max |
Sensor reading numeric value. |
 |
Sensor Reading (Text) | Text | Text | Reports the reading of the sensor with units as a text string so that it can be quickly displayed on the NXT screen. |
![]() Tip:
Displaying Sensor Readings on the NXT Screen
Tip:
Displaying Sensor Readings on the NXT Screen
Carbon Dioxide sensors (they require too much current), Infrared Thermometer (IRT-BTA), +/- 10 Volt voltage probe (VP-BTA), Ion Selective Electrodes, and sensors that require fast sampling, including: Microphones, Blood Pressure Sensor, Heart Rate Monitors, and EKG. A complete list of compatible sensors and information about them is at http://engineering.vernier.com.
Zeroing and Calibration with the Vernier Sensor Block
Using the Action control, you can set the Vernier Sensor Block to Zero/Calibrate. This provides a way for you to adjust the calibration of the sensor you are using. For example, if an accelerometer is not reading zero acceleration when it is at rest, you can adjust it so it correctly reads zero. Build a program with Vernier Sensor Block at the beginning. Choose the accelerometer as the sensor to use for this block and choose Zero/Calibrate as the Action. When you download and run the NXT program, have the accelerometer oriented as you want to use it and at rest. When this block of the program executes the reading will be adjusted so that the acceleration is defined as 0. This adjustment will be used in all other blocks in the program. This zero adjustment is saved in the VernierSensorXX.cal file on the NXT, where XX is the sensor number. This file will be used until you delete it from the NXT. You can do this by using the NXT Controller in the MINDSTORMS computer program, or by using the Vernier Sensor Block set for Reset action, and set for the same Vernier sensor.
When you use a Vernier Sensor Block with the Action control set to Reset, you can remove one of these .cal files and restore the default calibration. Build a program with Vernier Sensor Block at the beginning. Choose Reset for the Action and choose the appropriate sensor from the Sensor pull-down list. When you download and run this program and this block executes, the calibration file for that type of Vernier sensor will be deleted from the NXT.This type of zeroing works for all Vernier sensors except pH, which has a special procedure explained below.
Zero/Calibration with a pH sensor
Since there is no such thing as 0 pH, we have an alternative way to adjust the calibration of the Vernier pH sensor. This calibration adjustment depends on the use of a pH 7 buffer. This is a solution available in most science classrooms that is made to have a pH of exactly 7.0. Build a program with a Vernier Sensor Block, set for pH, at the beginning. Choose Zero/Calibrate on this block. When you download and run the NXT program, have the pH sensor in the pH 7 buffer. When this block of the program executes the reading will be adjusted so that the pH reads exactly 7.0.
Other Notes about Calibration of Vernier Sensors
Calibration done as described here, affects the readings displayed on the NXT and on the graphs made in NXT 2.0 Data Logger. It does not change the reading displayed in the configuration panel of the Vernier Sensor Block at the bottom-left of the NXT 2.0 Programming screen.The way calibration is handled with the Vernier Sensor Block on the NXT means that all blocks which are set for the same Vernier sensor use the same calibration. If you adjust the calibration on one Vernier Sensor Block, you change the calibration of all Vernier Sensor Blocks using the same sensor setting. For example, if you have two different Vernier Force Sensors used in a program, they both share the same calibration. If you use a Wait, Branch, or Loop block set up for a Vernier Force Sensor, it will also use this calibration.
An alternative way to calibrate a Vernier Sensor for use with the LEGO NXT, is to edit the file Vernier Sensor calibrations.txt. This is a text file, which you can open on a computer and edit, to change the calibrations used by the NXT. See the file Adjusting Calibrations, which is included with the Vernier Sensor Block folder or see www.vernier.com/nxt for details.
For information on Vernier sensors, check out http://engineering.vernier.com or www.vernier.com/nxt .