LaTeX Setup and Tutorial
Setup and Tutorial for Using LaTeX with TextPad/MiKTeX/Yap
Introduction
LaTeX works like this:
First, you use a text editor (we'll be using TextPad) to create a
LaTeX document foo.tex (note: "foo" is standing in for your file name).
Then, you run a LaTeX compiler (we'll be using MiKTeX) to turn the file
foo.tex into three files: foo.aux, foo.log, and foo.dvi.
Finally, you need to use some kind of viewer/previewer (we'll be
using Yap) to view or print the pretty formatted file foo.dvi.
You will do everything from TextPad, which we will set up to control MiKTeX
and Yap. This document will take you through the steps of downloading,
installing, configuring, and working with MiKTeX, TextPad, and Yap.
Be sure to follow ALL of the directions below, IN ORDER. Consider this
the first test of your logical thinking abilities!
I recommend that you
print out this document so that you can refer to it easily and
check off steps as you do them.
Don't be afraid to send
me email or an instant message if you get really stuck. (Double-check that you have
Actually Followed The Directions before you do this!)
Downloading and installing MiKTeX
- Go to www.miktex.org.
- Choose the "miktex 2.4" link from the Download/Install menu on the left
(NOT the "Status" menu).
- At the top of the page, select the link "small-miktex=2.4.1705.exe".
- Pick a nearby download mirror and download the file;
choose "Save", and save the file to your Desktop.
- After it finishes downloading, double-click on the file to open it;
the Setup Wizard will now open.
- Go through "Next" a few times, keeping the defaults - don't change anything at all. I mean it! Are you changing something? Stop it!
- Setup Wizard will do stuff for a while, moving files around and stuff;
click "Next" when it stops, and then "Finish".
- Throw away (put in Recycle Bin) the installer "small-miktex-2.4.1705.exe" that is on your Desktop.
- Please note that MiKTeX is a shareware product. For a voluntary
$15.00 donation they will provide direct email support; see their
registration page.
Downloading and installing TextPad
- Go to
www.textpad.com/download/index.html#downloads.
- Choose one of the English downloads and save the file to your Desktop.
It will be called something like "txpeng473.exe".
- Double-click on the file to run the installer.
Agree to the license and type in your name if requested, but leave all
other defaults as they are.
- Throw away (put in Recycle Bin) the installer "txpeng473.exe" that is
on your Desktop.
- Please note that TextPad is a shareware product. Single-user
registration is $30.00; see
their registration
page.
Configuring TextPad to run LaTeX
- Open TextPad. (It should be in your list of program files from the Start
menu. You might want to make a shortcut from your Desktop.)
- Open the preferences page by going to the Configure menu and selecting "Preferences..."
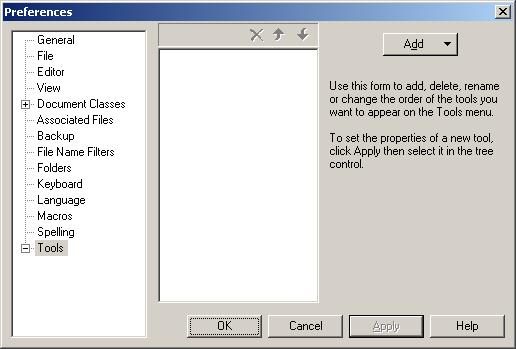
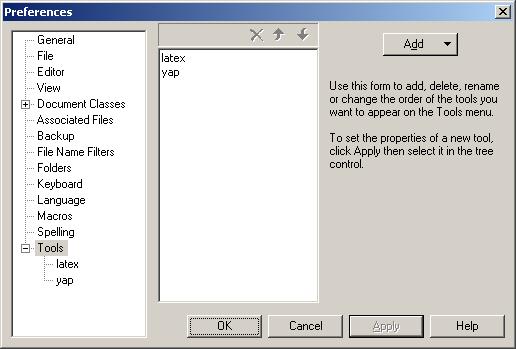
- At the bottom of the left-hand column of the preferences pages, you will notice the word "Tools".
Select it. You will now see the following:
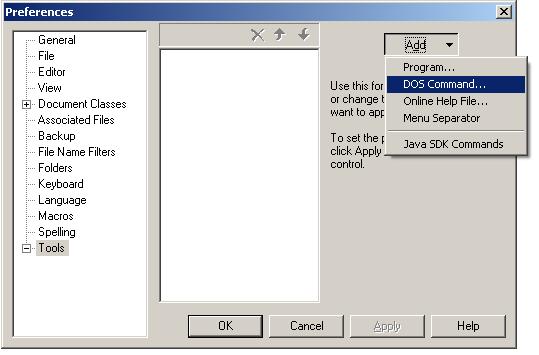
- Click the "Add" button on the upper right and select "DOS Command".
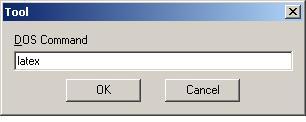
- You'll see the following text box, into which you'll type "latex".
- Hit OK, and then select "DOS Command" again, but this time type "yap" into the text box. After hitting OK again, you should see this:
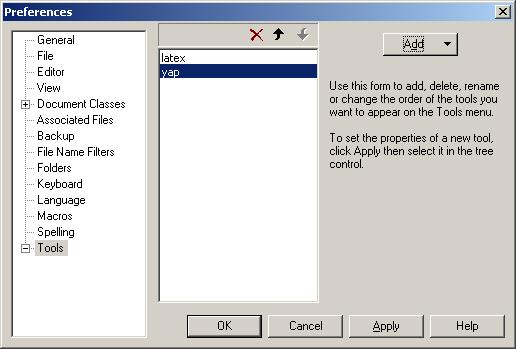
- Hit the "Apply" button, and you'll see this: (you may need to click the box next to "Tools" in order to see the two new entries in the left-hand column.)
- Now select the "latex" entry in the left-hand column, and edit the text boxes, check boxes, etc., to make it look exactly like this (note there is a space between "latex" and "$File" in the Parameters text field):

(Seriously, does your window look EXACTLY like that? With the same boxes
checked? Double-check please!)
Now select the "yap" entry in the left-hand column, and edit the text boxes, check boxes, etc., to make it look exactly like this (note there is a space between "yap" and "$BaseName.dvi" in the Parameters text field):
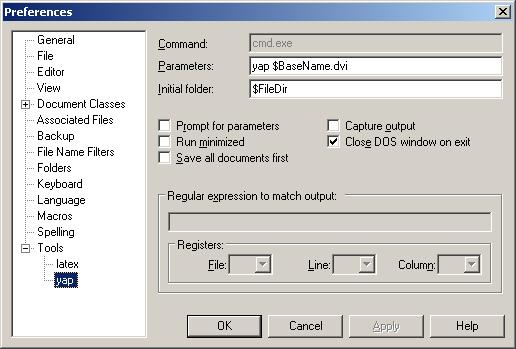
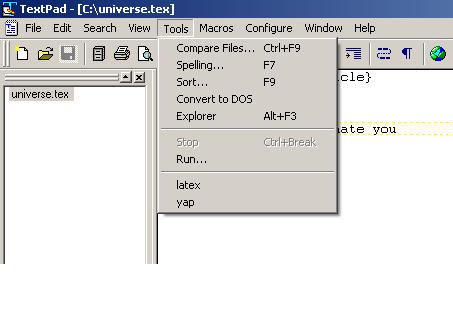
Finally, click "OK". You should now be able to see your two new commands under the Tools menu:
Configuring TextPad to colorize LaTeX documents
- With TextPad open, select menu Configure --> New Document Class
- For Document Class Name, type "latex" and hit "Next".
- For Class Members, type "*.tex" and hit "Next"
- Click "Enable Syntax Highlighting".
- For Syntax Definition File, select "LaTeX.syn".
- Hit "Next" and then hit "Finish".
Creating a simple document using LaTeX
Now we're finally ready to write a document in LaTeX. The instructions below
will take you through the process of creating a very simple document.
- Write: In the TextPad program, type this:
| \documentclass{article} |
| \begin{document} |
| Hello universe! |
| \end{document} |
- Save: Save this file as "universe.tex" to whatever directory
you choose. Be sure the extension is "tex" and NOT "txt". Also be sure to
select "All Files" under the "Save as Type" menu before you save.
- Compile: From the "Tools" pulldown menu in TextPad,
choose "latex". This
will cause a black window to appear. If there are no compiling errors
in your .tex file, then some typing will
appear in the black window and the black window will close. Now in the same
directory where you saved universe.tex
should be three new files: universe.aux,
universe.log, and universe.dvi. These files will be updated every
time you run latex on universe.tex. Take a moment now to go to your
directory/folder and check.
POSSIBLE PROBLEM: If only the file universe.tex is there
then it is possible that your system does not know where MiKTeX is installed.
If you have the .aux, .log, and .dvi files in your folder then
you are not having this problem, so skip this part.
If you don't have these files along with universe.tex in your directory,
OR if your "black window" is just flashing by really fast and then nothing
seems to happen when you "yap", OR if you get an error message
like this: "'latex' is not recognized as an internal or external command,
operable program or batch file", then keep reading. Your problem is
most likely that
your system does not know where your MiKTeX files - i.e. LaTeX - has been
installed. For some reason, on some systems at least, MiKTeX does not
define its "path" to the system. To fix this problem, you're going to
set the path manually, as follows:
- View: From the "Tools" pulldown menu in TextPad,
choose "yap". If no errors happened in the previous step, this
will open a viewer where you can see your compiled
file universe.dvi. You can zoom in/out and do various things to look at your
document here.
- Repeat: Now if you want to modify your file, go back and repeat
the steps above... with one exception: if you already have a "Yap" window open,
it should automatically update after you do step 3; this means you won't
have to choose "yap" from the pulldown menu - you'll just have to look at
your existing Yap window to view the new compiled document.
Test the process by changing the word "Hello" with the
word "Howdy" and going through the steps: Write, Save, Compile, View.
Handling compiling errors
LaTeX is a very picky typesetting program, and a lot of tiny things can
cause compiling errors. By following the instructions below you will
introduce an error into your universe.tex file and then see how to deal with it.
- Change your universe.tex file so that it looks like this:
| \documentclass{article} |
| \begin{document} |
| Howdy universe! |
| The & is a special character.
|
| \end{document} |
- Save universe.tex and try to compile it (steps 2 and 3 above). The
black window should appear, with typing in it, but it will "crash" before it
is finished.
- Read the last few lines of information in the black window. It should
look something like this:
| ! Misplaced alignment character &. |
| l.4 The & |
 is a special character.
 |
- In LaTeX, the "&" character is used for tabbing
(alignment) in certain environments, but it is not a legal character
on its own; that is what the first line of the error message above is saying
- that the character "&" is being used somewhere it shouldn't. The "l.4"
at the beginning of the next line of
the error message tells you that the error is on line 4 (it says "lowercase ell
dot four" not "one dot four" at the beginning of the line). Notice also
that the line breaks where the compiler thinks your error might be: at the "&"
character.
- Because the compiler crashed, the black window will not go away on its own.
At the "?" prompt type "x" and press Return/Enter, and the window will
go away.
- It's pretty clear that we need to get rid of or modify that "&", but for
the sake of this exercise, let's say you don't understand the error message
completely, but you do think that line 4 could be the culprit. One thing
you can do is "comment out" the line in question, by inserting a "%" symbol
at the start of the line. In LaTeX, the rest of the line following a "%" symbol
is ignored by the compiler. Do this, and then compile again, and you should
not get any errors.
- Of course, after the step above, you got rid of the error, but you also
didn't get the document to say what you wanted; let's fix the error. In
LaTeX, the character "&" can be produced by typing "\&". Un-comment line 4
(i.e. remove the "%" symbol) and put a backslash "\" in front of the
ampersand. Recompile and everything should work.
Printing a finished LaTeX document
If you want to print right from the computer you are working on, it's easy;
just choose "Print" from the "File" menu of the Yap viewer.
If you want to print from a computer that does NOT have LaTeX installed
(or is you want to send your file to someone who does not have LaTeX
installed, but needs to see your beautiful typeset file), do the following:
Repeat steps 1, 2, 3, 4, 5, 7, 8, and 10 from the "Configuring TextPad
to run LaTeX" instructions given above, with the word "latex" replaced
everywhere with "pdflatex". This will add a new command to your "Tools" menu
in TextPad. If you use this command on a file foo.tex, it will produce a
file foo.pdf that can be viewed and printed by anyone, on any computer, using
Adobe Acrobat PDF Reader.