
Finder Basics
Terms used in this tutorial:
Alias
Apple Guide
Create folders
Dialog Box
Delete Files or Folders
Find files
Finder
Get Info
Help menu
Icons, name
Move Files
Nest Folders
Open hard drive
Rename files or folders
Startup Procedure
Window information
Turning on the Mac begins the following sequence of events: (1) The startup manager in the ROM tells the CPU to check certain hardware, such as RAM and ROM. If there is a problem, then a sad Mac face is displayed on the screen; (2) If everything checks out, then space is created in the RAM for a system partition, which allows for the system information to be stored; (3) The CPU then begins looking for a startup disk. It looks first at the floppy disk drive, then the hard drive, and finally the CD-ROM drive. If it doesn't find a System Folder, then it displays a disk with a question mark on the screen; (4) Assuming everything is OK, then enabler files are loaded which are patches for the ROM. These are system changes which have occurred with system updates; (5) The next files loaded are Extensions. These are files that allow the computer to accomplish certain tasks like print; (6) The Extensions are followed by the Control Panels. These are files that allow the user to adjust the desktop pattern or sound adjustments, etc.; (7) Finally, the Finder application is loaded that creates the desktop look of the Mac. To see how the Mac would startup, click the arrow on the bottom of the frame on the left. You will see the Happy Mac face followed by extensions loading and finally the finder application which loads the desktop and shows the hard drive icon and trash icon.
What is the finder?
The Finder is an integral part of the operating
system; it is a super-program that creates the desktop and its menus.
The Finder is a very specialized application that is launched automatically at startup and from which you cannot quit. The Finder provides a view into all the storage devices connected to the Mac. On the desktop, the Finder depcits applications and data files as icons or as text lists in windows. It also allows users to create folders to store files or other folders.
The Finder locates the files you need on your storage disks. Throurgh the use of an invisible databased called the Desktop file, the Finder keeps track of dozens, hundreds, or thousands of files that you have on floppy disks, the hard disk, or other storage devices mounted on the desktop. You also use the Finder to rename, copy, and delete files by using the Trash.
The Finder launches applications--locating the application on a disk, loading it into RAM, and opening the application window on the desktop. To launch an application or program, you can double-click directly on an application icon or name, or you can double-click on a data file. The Finder knows which application created the file.
With the System 7 and 8 Finder, you can use aliases to access files that are buried deep within several nested folders. An alias is a dummy file that is linked to the nested file it represents. Double-clicking on an alias opens the file it is linked to without having to open any folders.
The Finder also lest you modify your system setup by adding fonts and sounds, and changing settings in the control panels. You can even customize your files' icons by pasting new ones into the Finder's Get Info box for each file.
?Menu or Help
You can use Balloon Help to learn more about
the features and commands of an application.
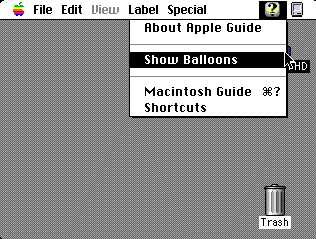
Balloon Help is descriptive text that appears in a cartoon ballon near a command or control. It appears and disappears as you move the mouse near the various controls.
To access Ballon Help, select Show Ballons from the ? menu.
Apple Guide
Apple Guide is an interactive help system that
guides the user step-by-step through a series of tasks. With Apple Guide,
you can learn how to accomplish new or complex tasks by following on-screen
prompts, called "coachmarks."
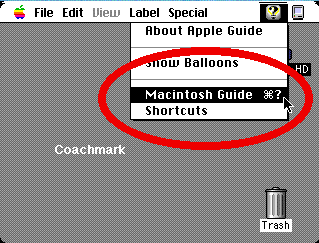
Coachmarks provide visual clues by circling or highlighting items, such as menu selections.
Apple Guide also provides functionality for third-party
developers to create
guides in their application programs.
Open a Hard Drive
There are two wasy to open a hard drive:
1) Double-click the startup
disk.
2) Click the startup disk icon to highlight
it, and choose Open from the File menu. 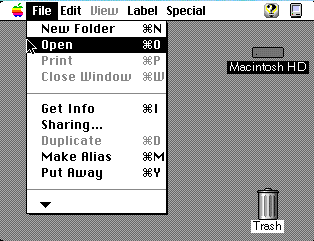
Close a Hard Drive
There are two ways to close a hard drive:
1) Click on the Macintosh HD open windows to
activate it, and select close from the File menu.
2)Click on the open window to activate
it then click on the Close Box in the left corner of the Macintosh HD window
Get Info (command +
i)
This command in the File Menu allows you
to get information about an application or a file as to kind of file, size
of the file on the hard drive, where it is located, when it was created,
when it was modified, version, and memory partition.

The suggested size is set by the software manufacturer, but this can be adjusted if you are working with large files. The larger the size of the partition, the fewer times the application will need to go to the disk and thus will run faster. The Minimum size can't be larger than the Preferred Size.
Windows: Active Window
The active window is the one that's in front
of all windows, except for Mac Guide window. When activated, the Mac Guide
appears in front of the active window. For example, even as you type a
document in a word processing applictaion, the Mac Guide window appears
in front of the document window.
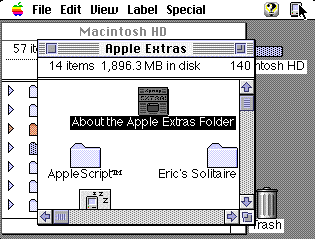
The active window has solid lines across the title bar (at the top of the window) and usually has controls that you can use to manipulate the window.
Using Windows: Bring a Window to the Front
To bring a window to the front, click any part
of the window that is visible.
If you can see only the window's title bar, double-click the title bar to open the window.
You cannot bring a window in front of a Mac Guide window.
If you can't find a window you want, try hiding the windows that belong to the other programs.
Using Windows: Hide Windows
You can hide or show the windows belonging to an
open prgram. You can also shrink any window so that only its title bar
is showing, or expand it from the title bar.
To hide windows of an active program, open the Application menu, and choose the Hide command. Or, to hide the windows of the program that are not active, choose Hide Others.
If the program you want isn't listed in the Application menu, that means it is not open.
If you inadvertently hide the wrong window, you can open the Application menu and choose Show All or choose your program's name.
Using Windows: Show Windows
To show windows, open the Application menu and
choose the program whose windows you want to show. Or select Show All to
see the windows of all open program.
Using Windows: Resize windows
You can resize a window with the size box or
the zoom box at the lower or upper right corner of the window.
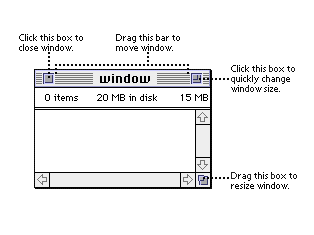
The zoom box expands the windows to show its complete content and shrinks the window to its most recent smaller size.
Using Windows: Shrink Windows
You use the WindowShade control panel to change
the command that shrinks a window so that only the title bar shows. The
same command expands a windows when only the title bar is showing.
In either case, you can double-click or triple-click the title bar to shrink or expand the window. You can set the clicking options in the WindowShade control panel.
Control panels are discussed in the System portion of the tutorial.
Using Windows: Scroll Bars
Yet another way to see more of what is in a window
is to scroll, using the scroll bar at the bottom and right side of the
windows. You can scroll by clicking on and dragging a scroll box. Clicking
the scroll arrows without dragging scrolls the window a little at a time.
Name and Edit Icons
To give a new name to an icon, follow these steps:
1. Click the file's name under the icon, not
the icon, to select it.
Without moving the mouse, wait for the I-beam
to appear and the name to become outlined in white.
2. Type the new name.
3. Press return or click anywhere outside the icon for the change to take effect.
To edit part of an icon's name, add one of the following steps:
1) Drag to select what you want to replace and type the new characters.
2) Drag to select text you want to delete and then press the Delete or Backspace key.
Inserting and Deleting Characters
To insert characters:
1. Click to position the I-beam pointer to the
left of the word or space where you want to insert text.
2. Start typing
To delete characters:
1. Click to position the I-beam pointer to the
right of the text you want to delete.
2. Press the Delete or Backspace key, and each
character to the left of the insertion point will be deleted.
Move Multiple Files
The techniques for moving groups of files or
folders are the same as they are for just one file or folder. First select
the group of files or folders you want to move. You can select multiple
files or folders with the mouse or you can select all the contents of a
window by choosing Select All from the File menu. Then drag the file icon
or icons to their destination on the same disk. If you move the icons to
a different disk, they will be copied to that disk, but will not move from
their original palace. (See the Quicktime movie below)
Move files
If you want to keep one or a few files in their
original location, after selecting all the files to be moved, hold down
the Shift key and click on the files you don't want to move. They will
be deselected.
Move files by using the marque
If you want to select a few items that are close
to each other, you may hold down the mousebutton and select the items.
(See the Quicktime below).
You can place the icon in either the icon of a folder or into an open window of a disk, folder, or desktop. You can also place a folder in another folder, but files and folders may become difficult to find if they are nested in this manner.
Create a folder
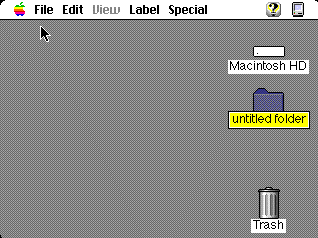
To create a new folder, choose New Folder from
the File menu. The folder will be placed in the Finder window that is active
when you choose the command. It will be named "untitled folder," and the
name will be highlighted, so you can rename the folder immediately by simply
typing a name.
Delete Files Using the
Trash
When you want to delete a file or folder from
a disk, drag its icon to the Trash icon. When the Trash icon becomes highlighted,
you know that your file or folder is in the trash. (Do not release the
mouse button until the Trash icon becomes highlighted.)